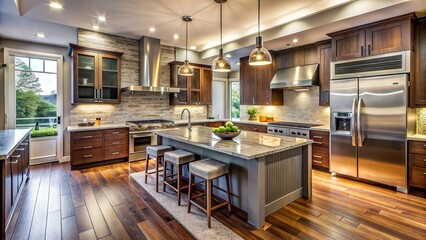
Cabinet Refacing is a popular kitchen remodeling option that gives your existing cabinets a dramatic new look. It’s often paired with new cabinet doors to make the transformation complete.
Selecting the right materials is crucial to a successful and cost-effective project. Here are some tips to help you choose the best refacing materials for your kitchen.
Solid wood
Solid wood cabinet refacing provides a luxurious, high-quality aesthetic that complements a wide range of design styles. It’s also an affordable option, and it’s durable enough to last for decades. However, refacing can be complicated and time-consuming. It’s important to consider your skill level, time commitment, and desired results before making a decision. If you’re not comfortable working with power tools or have limited DIY experience, it may be better to hire a professional.
Another consideration when choosing cabinet refacing materials is their environmental impact. Some homeowners prefer to use sustainable options, such as bamboo or reclaimed wood, to create a unique look while contributing to a healthier indoor environment. Others are concerned about the amount of chemicals used in traditional finishes, so they opt for low-VOC adhesives that emit fewer harmful fumes.
Other cabinet refacing material options include laminates and thermofoil. Laminate is made from thin layers of plastic laid over particle board, followed by kraft paper with a printed design (often a wood grain pattern). A clear resin is then applied as a sealant. This versatile material offers a budget-friendly option that’s resistant to moisture, heat, and stains. However, it’s not as durable as solid wood or veneers, and it can chip or scratch easily.
Hardwood veneer refacing is similar to laminate, but it uses real wood panels that are pin-nailed directly onto your cabinets. This allows you to enjoy the beauty of natural wood without the cost and hassle of a complete kitchen renovation. It’s a good choice for homeowners who want the quality of hardwood cabinets but are unable or unwilling to invest in a full-scale replacement.
While refacing is an affordable, efficient, and relatively non-disruptive kitchen remodel project, it’s not for every homeowner. This project requires a high degree of precision and specialized knowledge to ensure success. For those who have the skills and ambition to complete it on their own, refacing can be a rewarding DIY project that yields impressive results. However, for those who are unfamiliar with DIY projects or would like to save time and money, a professional refacing service is the best choice.
Paintable laminate
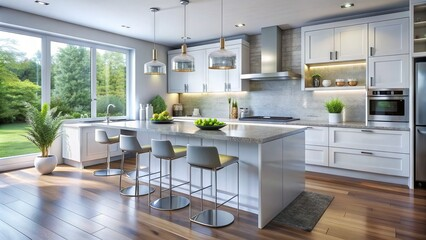
Cabinet refacing is a cost-effective way to give your kitchen a facelift without the expense of purchasing new cabinets. However, the right materials are essential for a seamless transformation. The best choice depends on your preferences and budget, as well as your kitchen habits and design goals. Some homeowners choose solid wood refacing for its classic appearance and durability, while others prefer less expensive materials like laminates or melamine. Whatever your style, you can create a stunning look by refacing your cabinets with the right material.
Before starting your refacing project, prepare the old cabinet boxes by removing the doors and drawer fronts. Label each door and drawer to help you reattach them in the proper place once the project is complete. Then, clean the cabinet boxes and remove any dents or chips. Refacing requires precise measurements, and even a slight miscalculation can result in gaps, overlaps, or uneven surfaces. Take your time and double-check all your measurements to avoid costly mistakes.
The most common material for DIY refacing is wood veneer, which offers the flexibility to match any existing cabinet door or drawer front design. Thermofoil is also an excellent option for refacing, with its durable surface and versatile finish options. However, it’s not as easy to apply as wood veneer and requires extra preparation. You’ll need a heat gun and iron to activate the adhesive, as well as a J-roller for applying firm, even pressure. You’ll also need a trimming router to trim the edges after application.
Another popular option is FormSurface paintable backer, which can be used on panels faced with veneer or high-pressure laminates to create a smooth and flat surface. It’s available in both three- and five-ply panel construction and can be painted or printed. It also provides a cost-effective alternative to high-pressure laminates for balancing particleboard, MDF, and other composite panels.
Many homeowners opt for sustainable materials such as bamboo or reclaimed wood when choosing a refacing material. They are eco-friendly and provide a unique look to their kitchens. In addition, some cabinet refacing companies offer products that are low in VOCs (volatile organic compounds), which help improve indoor air quality and reduce harmful emissions.
Medium-density fiberboard
Cabinet refacing is an increasingly popular way to give your kitchen a fresh new look without tearing out your existing cabinets and installing a whole new set. This cost-effective approach offers the opportunity to choose from a variety of materials that best suit your personal style, budget, and design preferences. However, not all cabinet refacing materials are created equal, and you should familiarize yourself with the different options available to ensure that you select the right ones for your renovation project. Fortunately, luxury cabinet refacing contractors can guide you through the process and help you make an informed decision that suits your specific needs and preferences.
When choosing your refacing materials, it’s important to consider the desired durability and longevity of your new kitchen. Solid wood offers a timeless, durable look that can stand up to years of wear and tear. It may be more expensive than lesser materials, but it is also less prone to damage and can be refinished several times over the course of a lifetime.
Other common refacing materials include veneers and laminates. Veneer is a thin sheet of wood with a smooth surface, and it can be used for many different applications, including furniture refacing. It is lightweight, strong, and water-resistant. However, it can be susceptible to warping if exposed to direct sunlight or moisture. In contrast, a thick sheet of MDF is made up of pulverized wood fibers blended with resins and pressed into sheets under heat and pressure. It is heavier and more durable than plywood, but it does not have as much flexibility as real wood.
To prepare the face frame of your cabinet boxes for refacing, carefully remove all the existing cabinet doors and drawer fronts. Label them and take careful note of their locations so you can put them back in the proper place when your refacing is complete. Next, clean and sand the surfaces of your cabinets to create a smooth canvas for your new material. Lastly, add some finishing touches to your cabinet refacing, such as crown molding or under-cabinet lighting, to enhance their beauty and functionality.
Paper-back veneers
Cabinet refacing is an increasingly popular method of giving your kitchen a new look without the cost and hassle of replacing all the existing drawer fronts and cabinets. It involves wrapping thin strips of a chosen material over the existing wood cabinet boxes and frames to create a cohesive look. There are many different materials that can be used, but the best choice depends on your budget and design preferences.
Veneers offer a budget-friendly alternative to solid wood, providing a beautiful natural appearance. They are available in a wide range of wood species and finishes. However, they are not as durable as solid wood and may be more susceptible to damage over time. They also require regular maintenance, such as sanding and refinishing.
If you choose to use paper-backed veneers, it is important to acclimate them for several days before applying them. The acclimating process helps to minimize the effects of seasonal humidity changes and prevents air bubbles. This can be done by placing the veneer sheets on a flat surface and using weights to keep them flat.
The back of a paper-backed veneer is bonded with adhesive film, making it easier to apply than traditional veneers. It is typically applied with a pressure sensitive adhesive, such as Titan DX contact cement. This adhesive is low in VOCs, which helps to improve indoor air quality and reduce harmful emissions. It is important to test a small piece of veneer for compatibility with your substrate and adhesive before beginning the project.
When choosing the right paper-backed veneer for your project, it is important to select a high-quality product with a smooth finish. A smooth surface is necessary to ensure a strong bond and long-lasting results. It is important to use a sharp utility knife when cutting the veneer sheets to avoid uneven surfaces and gaps. It is also a good idea to cut the veneers slightly larger than needed and trim them after they are applied.
To help avoid air bubbles and wrinkles, it is crucial to carefully align the veneer sheet with the cabinet surface. Use a powerful light to check for peaks and shadows on the surface of the veneer before applying the adhesive. After a few minutes, you can sand the edges of the veneer to smooth the surface and remove any rough areas.