Adding a fresh coat of paint is a cost-effective way to transform your kitchen without investing in a major remodel. However, cabinet refinishing requires proper preparation and care to achieve long-lasting results.
Understanding realistic timeline expectations empowers homeowners to plan effectively, coordinate household schedules, and avoid frustration. This cabinet refinishing timeline guide reveals exactly how long each project phase takes, with tips for minimizing disruption. Contact Cabinet Refinishing Sacramento for more details.
Preparation
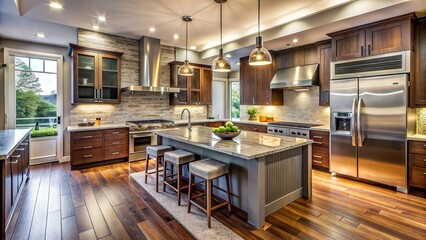
The kitchen is often described as the heart of the home, and its cabinets are its functional and aesthetic backbone. Over time, however, cabinets can show signs of wear and tear, leaving them looking dated and dull. When this happens, homeowners typically have two options: replace the cabinets entirely or refinish them. The latter option involves sanding down the existing finish and applying a new stain or paint, allowing homeowners to dramatically change the look of their kitchen without the cost and hassle associated with complete replacement.
The first step of cabinet refinishing is cleaning the cabinet surfaces and face frames. This is a crucial step that requires the use of a degreaser to remove grease, dirt, and grime from the surface. Without a thorough cleaning, the new stain or paint may adhere poorly to the cabinet surface and fail to bond properly.
After cleaning the surfaces, a light sanding is performed with medium-grit sandpaper or a random orbital sander. This step prepares the surface for painting and helps achieve a smooth, even finish that will withstand years of heavy use.
Once the sanding is complete, the cabinet surfaces must be primed. A high-quality primer like KILZ 3(r) Premium Primer provides a strong foundation for the topcoat while protecting the substrate from moisture and preventing color transfer. This primer also dries quickly, has low odor, and can be applied in a single coat to reduce project duration.
After the primer has been allowed to dry completely, it’s time for the final coats of paint. A quick-drying, semi-gloss acrylic latex paint is a popular choice for cabinet refinishing because it provides an attractive, durable finish. However, a satin or eggshell finish will provide a more subtle, soft look that some homeowners prefer. After all of the paint has dried, it’s a good idea to allow at least 24 hours for full curing. During this time, it’s best to treat the surfaces gently and avoid putting any heavy items or sharp objects into the cabinets for a period of time. After 48 hours, reloading the cabinets is permitted but should still be done carefully to prevent chipping or other damage.
Painting
Cabinets serve a critical role in the functionality of a kitchen, so it makes sense to update them when they begin looking worn and dated. The cost and time commitment of a full replacement project often deter would-be DIYers from taking on the task, but refinishing is a more affordable option that can deliver a like-new result. Whether you prefer a stain or paint, the process of refinishing cabinets is fairly simple and straightforward, but the preparation phase is key to achieving a beautiful finish.
The first step is to thoroughly clean the surfaces. Scrape off any stubborn grease or food residue and wash with soap and water. If necessary, you can use a chemical such as trisodium phosphate (TSP) mixed with water to remove tough stains or oil. Be sure to scrub and rinse thoroughly to ensure the surfaces are free of debris and oils that will prevent proper adhesion to the new finish.
After scrubbing, you will need to sand the cabinets to smooth out the surface. This can be done by hand or with a sanding sponge, but an orbital sander is ideal for the job. Lightly sand the cabinets using medium-grit sandpaper before moving to fine-grit. Be sure to sand along the grain of the wood and vacuum or tack the surfaces to remove any dust before proceeding.
Once the sanding is complete, you will need to prime the surfaces to prepare them for painting. A good primer will help to ensure a long-lasting, durable finish, so make sure to select an appropriate product for your cabinets. For example, a mildew-resistant primer is important for a high-traffic area such as the kitchen.
After priming, you can apply the color of your choice to the cabinets. Again, be sure to choose a high-quality, professional-grade product that will provide excellent adhesion and a long-lasting finish. If you want a truly flawless look, consider hiring a professional to do the job for you. They will have the right tools and techniques to produce a smooth, even finish that will last for years to come.
Sanding
Before painting cabinets, the surface must be sanded. This is necessary to create a rough surface that will help the new paint adhere to the cabinets. Sanding also removes any old stain or paint from the cabinet, which makes them ready for the new finish.
You can use an electric or handheld sander to sand the cabinets. The sander comes with a range of grits that you can change as needed, from coarse to fine. Coarse grits have larger pieces of abrasive and will strip the surface more quickly. Fine grits are less aggressive and leave behind a smoother result.
When using a sander, it is important to move with the grain of the wood. Moving against the grain can cause scratches that show up later on the finished product. It is also recommended to wear a dust mask when sanding to avoid inhaling the dust particles. It is also a good idea to open windows and turn on a fan to provide adequate ventilation.
After sanding, the cabinets should be wiped down with a clean cloth or sponge and then wiped again with a damp cloth to remove any remaining dirt, grease, or grime. Then, it is time to prime the cabinets. A high-quality primer like KILZ 3 Premium can offer excellent adhesion and stain blocking capabilities. This primer also dries fast, allowing you to continue with your project sooner.
Once the primer has dried, you can apply your choice of stain or paint to the cabinets. Be sure to follow the manufacturer’s directions for application and drying times. Many stains and varnishes require up to 4 days of cure time, during which they emit toxic fumes that can be harmful to your family’s health.
Refinishing your cabinetry is a great way to give your home a fresh, updated look. However, it is important to assess the condition of your existing cabinetry before deciding which option is best for you. If your cabinets are in disrepair, refacing may be a better option. On the other hand, if your cabinetry is still in good condition and you want to change their color or finish, refinishing is an ideal solution.
Curing
Cabinet refinishing is a cost-effective way to revitalize a kitchen. It’s less expensive than refacing and can achieve a dramatic look without replacing existing doors or drawer fronts. However, it’s important to understand the process and anticipate the time commitment before starting. Taking the steps to prepare for the project can save you from a major headache down the road, as well as save you money and frustration.
Before the painting process begins, it’s essential to thoroughly clean the cabinets to ensure that your new finish adheres properly. Use a degreaser and a damp cloth to remove any food residue and other dirt, particularly in areas around handles and knobs where grease tends to build up. After cleaning, allow the cabinets to dry completely.
Next, you’ll need to sand the surfaces of the cabinet boxes and doors to create a smooth base. The amount of sanding required depends on whether the cabinets have been previously painted or stained and the type of finish you’re looking for. For example, a basic finish may only require scuffing with medium-grit sandpaper and then rinsing with water. If the cabinets are more heavily stained, you’ll need to strip the existing stain and sand the surfaces again before moving on to painting.
Once the sanding and painting are completed, you’ll need to wait for the cabinets to fully cure. This can take up to a week, depending on the environment and the quality of the paint used. Keeping the area well ventilated and using fans or air movers can help accelerate drying times.
Taking the time to carefully plan and execute your refinishing project will ensure a successful transformation that will last for years to come. If you have questions about the process or want to learn more, contact a professional renovation company for an in-home consultation. They will assess cabinet condition, discuss color options, and provide accurate estimates based on your specific situation. They will also address any concerns you might have before beginning the project, preventing miscommunication and disappointment down the road.